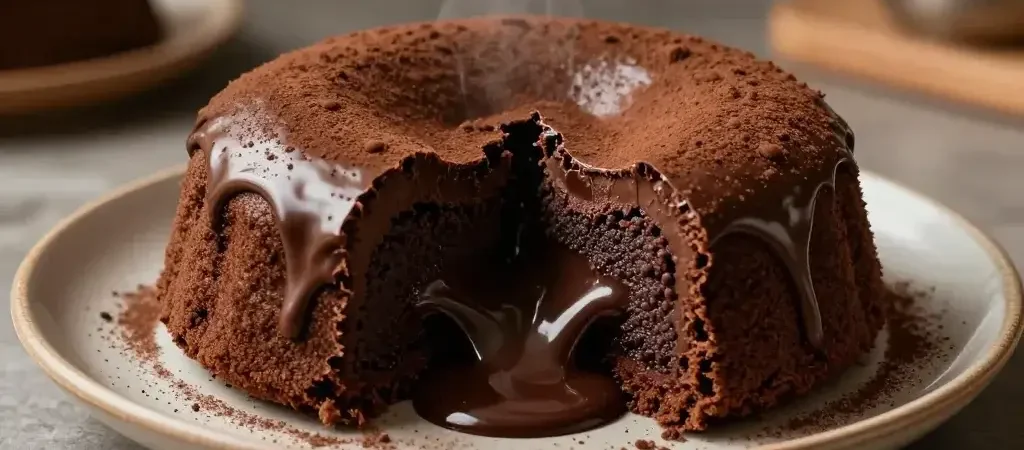
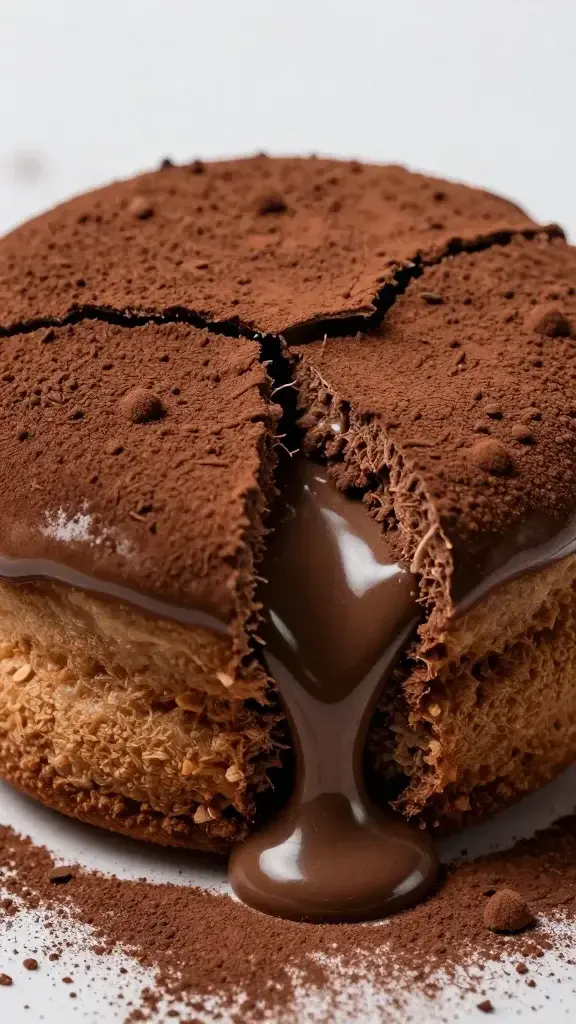
The moment a spoon sinks into that warm center, you know you’re in for a treat. Molten chocolate cake that tastes like a restaurant dessert, but you made it at home? Yes, please. This is the kind of dessert that makes your kitchen smell like cocoa heaven and your friends suddenly believe you’ve got secret culinary powers.
What makes a “restaurant-worthy” molten cake work at home
Can we be honest for a second? The magic isn’t just the gooey center. It’s balance: the cake should be tender and a little underbaked in the middle, the crack on top should be dramatic, and the flavor should be rich without shouting. You want a dessert that says, “Yes, I took a little extra time for this,” but not so fussy that you break into a sweat.
Key elements to nail:
- Mindful timing: bake too long and you lose the molten center; bake too little and the center stays liquid but the edges won’t set.
- Proper temperature: a hot oven is your best friend here. No middle-ground microwaving hijinks.
- Quality chocolate: you’re paying for flavor, not just sweetness. Pick 70%+ cacao for depth, or go your preferred cocoa-tinged route.
- Butter ratio: enough fat to keep it silky, but not so much it feels greasy.
FYI, I’m not pretending this is “easy-peasy” every single time. There will be imperfect rounds, and that’s part of the fun.
Getting the batter right without turning it into a science experiment
Let’s keep this simple and tasty. The batter is the backbone of that glossy, fudgy center, so treat it like a chill DIY project rather than a lab experiment.
Basic one-bowl approach
– Melt chocolate with butter until glossy.
– Whisk in sugar, then eggs, then a pinch of flour.
– Fold in a splash of vanilla and a whisper of salt.
– Spoon into ramekins and bake.
Why one bowl? Less cleanup means more time for licking the spoon. Also, fewer opportunities for overbeating the eggs, which can toughen the cake. Don’t overmix. The goal is glossy, not stiff.
Tips for a glossy center every time
- Room-temperature eggs help the batter come together smoothly.
- Sift the flour lightly—no需要 for a cloud, just a little to avoid lumps.
- Tap the ramekins on the counter before baking to pop any air pockets.
Tools and pantry picks that actually help
You don’t need a full pastry lab. A few smart picks keep things simple and reliable.
- Ramekins or a mini muffin tin: the classic route. They help with portion control and edge-to-center balance.
- Digital thermometer (optional but nice): to gauge if you’re hovering around that sweet 425–450°F range that delivers the crack without overcooking.
- Quality chocolate and a good unsalted butter. Don’t skimp here; flavor is everything.
- Silicone spatula for folding; metal whisk for a quick emulsification if you’re feeling fancy.
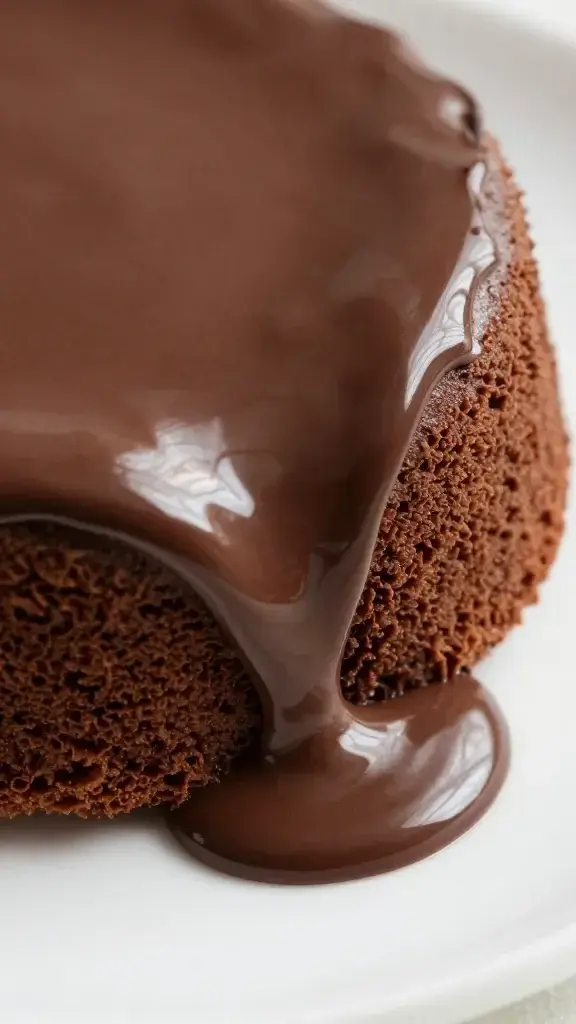
How to bake it so the center stays dreamy
This is where the magic happens, not magic beans, just smart timing and a hot oven.
Two-stage bake method
– Preheat to 425–450°F.
– Bake for 8–12 minutes depending on ramekin size and how molten you want the center.
– Let rest 1–2 minutes before serving to avoid a miscast volcano of chocolate.
If you use smaller ramekins, you’ll land on the 8–9 minute range; larger or deeper molds push you toward the 11–12 minute marks. FYI: ovens vary. Start checking early—you’re aiming for a center that looks set around the edges but wobbly in the middle.
Watching for signs
– The edges are set and the centers jiggle slightly when you gently shake the pan.
– The top has a slight crack that reveals the molten interior.
– A quick poke with a finger shows a soft center, not a pancake.
How you plate matters, too. Run a knife around the edge to loosen, then invert onto a plate for dramatic reveal, or serve right in the ramekin if you’re feeling casual.
Flavor boosters that boost a “restaurant vibe” at home
You can layer in flavors the same way a pro would, without losing the homey vibe.
- Salted caramel, peanut butter, or almond accents: a tiny drizzle after baking elevates everything.
- Vanilla or espresso in the batter for depth. A tiny espresso powder wakes up the chocolate.
- Fresh berries or a scoop of vanilla ice cream on the side for balance and contrast.
Making it ahead (because life happens)
Yes, you can prep this, but you’ll want to keep the molten center at the forefront.
Make-ahead batter
– Prepare the batter, chill for up to 24 hours in the fridge.
– Bring to room temp before baking; don’t go straight from fridge to oven unless you want a longer bake time.
Make-ahead baked cakes
– Bake cakes until just barely set in the center and refrigerate.
– Reheat gently in a warm oven for 5–7 minutes or warm briefly in the microwave (if you must) just to soften the center. This isn’t ideal, but it works in a pinch.
Common missteps (and how to avoid them)
We’ve all been there: batter glue, dry edges, or a center that’s more solid than serenely molten.
- Overbaking turns the center into a dry, boring wall. Set a timer, trust the jiggle test, and pull when the edges look just set.
- Undermixing leaves a dense batter. Fold gently and stop when glossy.
- Too much flour makes it cakey. Use just a light dusting—precision, not a snowstorm.
Serving ideas that scream “restaurant dessert at home”
Presentation matters, especially when you’ve already nailed the flavor.
- Dust with a pinch of flaky salt and a light shower of cocoa powder for a pro finish.
- Top with a dollop of whipped cream or a scoop of vanilla ice cream for contrast in temperature and texture.
- Pair with a bold espresso or a red wine reduction for the adventurous palate.
FAQ
Can I make molten chocolate cake without ramekins?
Yes. You can bake in a small casserole dish and spoon out portions, but ramekins keep the center molten more predictably and make portion control easy.
What chocolate should I use?
Go for good quality dark chocolate (70% or higher) and a reliable butter. The flavor punch comes from the chocolate, not from extra sugar bombs. If you only have milk chocolate, you can still make it work, but the center won’t be as intense.
Why is texture so important here?
Texture is the whole point—the contrast between a slightly firm edge and a molten center is what makes this dessert feel restaurant-quality. Texture is flavor’s best friend.
How can I speed this up for a weeknight?
Use premade batter or a mix as a shortcut, but keep the molten center by not overbaking and choosing the right pan size. A quick warm-up in the oven can transform a cold batter into a glossy, center-liquid dream.
Is this dessert kid-friendly?
Totally. Just mind the molten center—it’s molten, not lava. Let it cool a minute or two before digging in to avoid mouth burns, and you’re good.
Conclusion
If you’re after a dessert that feels like you booked a table at a fancy bakery, you’ve got this. The beauty sits in the balance: a crackly top, a luscious center, and a lingering chocolatey hug that makes you smile mid-bite. There will be imperfect rounds—so what? The next batch will be better, and the one after that might be perfect. IMO, the best part is that you can tailor the flavors, the toppings, and the timing to your mood and your crowd.
So go ahead: preheat, melt, fold, and bake. Grab the spoon, break through that glossy top, and savor the moment. You brought the restaurant dessert home, and it tasted like you spent all day in a fancy kitchen—without the pretension. FYI, you deserve that chocolate glow.